Tuesday, 18 March 2014

Moist chocolate sponge cake recipe (gluten free)

Hi all!  

Well, firstly, thank you all so much for your kind words and thoughtful comments, I just love reading them! It's been a busy few days here at the little Welsh house.  I've been working on getting things ready for a production of Macbeth, which I'm directing ready for a performance in June.  We also met friends for a meal in Cardiff and then went to see Wicked at the Millenium Centre (which was way better than I expected, I really enjoyed it), rebuilt our hens' run in the back garden which blew down during the storms, and then the last few days I have been endeavouring to get things a bit more under control on the allotment.

Anyway, I promised a recipe for a lovely fellow blogger Joy - a gluten free rich chocolate sponge cake.  This is great for celebrations - it is solid enough to ice easily without being stodgy and it keeps well for a good few days.  It also freezes well if you like batch baking.

It's one I came up with when two of my friends were diagnosed with coeliac disease - I wanted something easy that I could bake for parties so they didn't feel excluded. I like this recipe because it doesn't require special flour or additives and you can have a bit of a play with the quantities to get your preferred texture without it going horribly wrong.  

If you don't like chocolate, you can replace the cocoa with cornstarch, just make sure to use baking powder and add whatever flavour you like - I feel it does need a little something to cut through the richness of the almonds, so I don't personally recommend it plain.  Vanilla extract or a few drops orange essence and a couple of pinches allspice are favourites of mine.  In fact I sometimes include all three of those flavours in with the cocoa as they add a certain richness.

Rich chocolate cake

Ingredients

4 medium or large eggs
250g/9 oz butter
250g/9 oz muscovado or dark brown soft sugar
150g/5 oz ground almonds
100g/31/2 oz cornflour/cornstarch
2-3 heaped teaspoons good cocoa powder (I use Green & Blacks which is Dutch processed)
level teaspoon (gluten free) bicarb of soda OR (gluten free) baking powder
teaspoon vanilla extract

Method

Preheat your oven to about 160C.  In a large bowl, cream the butter with an electric whisk until really light and fluffy.  Add the vanilla extract, then the eggs one by one, whisking each time until the mixture is well combined and looks creamy.  

In a separate bowl, mix all the remaining dry ingredients together well.  Pour on top of the egg, sugar and butter mix and fold in gently with a metal spoon until well combined.  

Grease a loose bottomed cake tin (I use about an 8 inch diameter one) and dust with either cornstarch (fine if you plan to ice the cake) or a little cocoa (if you plan to just dust with icing sugar to serve).  

Pour in the batter and spread out well, then pop in the oven for 25 - 40 minutes.  The cake is done when it is solid and a sharp knife or toothpick inserted into the middle comes out clean.  It isn't as quick to burn as a classic sponge but if it is browning too quickly, just tweak the temperature down a little.  It will rise but don't panic if it sinks a little after cooking
It tends to flatten itself down nicely but it will still have a great crumb inside.

This cake is really good warm with vanilla ice-cream or cold with a good buttercream.  For a slightly less naughty topping you could also make an orange drizzle with orange juice and a little brown sugar.  It also looks good sprinkled lightly with a little icing sugar while still warm.  I got the striped effect on the one above by sprinkling the sugar on through a cooling rack which I thought looked nice.

Happy eating!

H xxx


Thursday, 13 March 2014

Losing the plot - to the weeds

Alpine strawberries!
I come from a long line of keen gardeners - despite which my knowledge is still about as scant as my time. My great grandparents on my dad's side were market gardeners and my grandparents on both sides were keen amateur gardeners - my grandad even managed to grow strawberries reliably in the far highlands of Scotland.   

Mostly homegrown veg for tea
My mum and dad have had their allotment, conveniently located behind their house, since I was about ten, but the truth is, in my teenage years, I didn't pay enough attention to the wealth of information they were sharing with me.  I didn't want to go out to the garden and weed, and I didn't know how lucky I was to be able to eat strawberries fresh from the vine on a summer day, or taste loganberry jam, or pick sharp, ripe apples from the tree.  

When I got my own place, I started to miss the space to grow things fresh.  When we moved to Bridgend, I got myself on the waiting list at the local allotments, and popped down on a weekly basis to nag them - as advised by the committee.  The land of the allotments were a gift to the people Brynna from a local estate called Ewenny way back in the middle of the nineteenth century.  By the way, if you have an interest in the Bridgend area and its history, I thoroughly recommend you check out the wonderful Hello Historia blog. 

Scrummy pumpkins - great for garlic mash
The soil at the allotments has been enriched and improved by generations of wonderful gardeners - I even inherited some lovely alpine strawberries that were hiding in the grass.  People from the local area are still enjoying all that the allotments have to offer for everything from growing veg to keeping geese and pigeons.  Despite my lack of knowledge, the soil is so fantastic that almost everything I have planted down there has grown.  Last year, although I only used about a third of the space, we got a useful amount of fruit and veg, and as my fruit bushes mature I really hope I will be able to make at least one batch of jam just from my own yield with no top up this year.

Sadly, I have found it almost impossible over the last few months to get down to my plot at all.  The light in the evenings has been very limited, as I am sure you know, weather has been awful, and due to the level of rainfall, even when it has been a sunny day I have hardly dared touch anything for fear of ruining the soil. 


Helping hands are so welcome!
I had some help from a friend back at the end of December, who very kindly spent a whole day helping me to eliminate some of the more dangerous triffids. We cleared a whole bed to plant some onions, and cleared in and around the blueberry bed.  

Since then I have been down to top up the blueberry bed with some nice acid mulch in the form of the pine needles from our Christmas tree and some used hen bedding.  But the plot was overgrown when I got it, and my battle against the weeds is a slow, ongoing battle, which often feels like a full on retreat...

Some of last year's yummy crops
Sunday was the first day I have managed to get down to the allotment to do any actual weeding and planting since the New Year.  I was inspired by the lovely Carrie at Grow Our Own to go and get stuck in at last.  What a lovely feeling to be there in the early spring sunshine, with my hands in the soil, planting food that I hope we will enjoy in months to come.  

Redcurrant cordial
At this time of year - the lean months - I try to focus on the delicious fruit and veg that we can look forward to. I am already excited to see how big my blackcurrant will grow this year - I really think it was worth removing all the baby berries two years ago to help it to thrive.  It is looking really healthy, and I am hoping for a small but decent crop this year.  Mum and dad had a glut of redcurrants last year, and I tried my hand at making cordial for the first time - I made redcurrant and summer fruits. I would simply love to make more flavours this year, as my hubby drinks squash like there's no tomorrow.


Dreaming of strawberries and fresh rocket,

H
xxx

Wednesday, 12 March 2014

Mum's easy sponge cake - big traybake

This recipe is so flexible, it can be scaled up or scaled down as needed to make cupcakes, muffins or sandwich cakes, but this quantity will make a good sized traybake..

6 free range eggs
375g/13oz self raising flour (I use Allinson's Nature Friendly and it reliably makes good cake)
375g/13oz granulated sugar (I usually use Silver Spoon)


As a tray bake, iced with sprinkles
375g/13oz soft butter or margerine (I prefer butter)

you will need:
a large oblong baking tin or roasting pan
an electric whisk
greaseproof paper

makes 12 big portions of traybake

Line the cake tin or roasting pan with greaseproof paper. 

Preheat your oven to about 150 C, or 160 C for cupcakes/muffins (I used to use about gas mark 6 in my gas oven). 

Before you do anything else, weigh the eggs in their shells.

As traybake squares
Then weigh out the same quantity of self-raising flour, butter and sugar - the amounts above are a guide.

I know it sounds over the top, but it's how my mum taught me and whenever I stick to this method, I get good cake.  It's easy to do and it does make a difference.  Eggs can vary hugely in weight, but if you weigh them, the quantities will always be in the correct proportion.

I didn't used to bother mixing the ingredients in a certain order, but after some experimentation, this is the method that I find reliably results in yummy cake:-

In a bowl, whisk together the butter and sugar until the mixture looks fluffy and almost white. 

Next, add the eggs one by one, whisking as you go.  Just a tip: mum always taught me to
As cupcakes, iced
crack the eggs into a cup before pouring it into the mixture - this way if one of the eggs is bad, you don't waste the other ingredients.  I didn't do this once, and I ended up throwing out a 6 egg batter. 


At this stage, add any flavours you want - some of my faves are a bit of good vanilla essence, two teaspoons of dried ginger or a few tablespoons of cocoa powder.

I don't bother sieving flour, but if you want to, go ahead.  Flour these days is generally of a good and consistent quality and doesn't tend to contain stones and chaff!  Generally speaking I don't .

This is the stage to fold in any chocolate chips, nuts or dried fruits.  If you are adding dried fruit, mix it into the flour first.  It seems to stop it sinking to the bottom quite so much.

As a Vicky Sponge, with buttercream and jam
Finally, take a spoon - preferably a nice big metal spoon (I have one from my grandma that I like to use) and fold in the flour.  

I find that the folding method of scooping the mix and spooning it over the flour in a sweeping circular motion keeps all the air in the mixture and makes for a cake which is light as well as rich. 

Pour/scrape your mixture, which should be nice and thick, into the paper lined tray, and put onto the middle shelf of the oven, where you can see it.  Depending on the type of tin you use, the cake will take between 20 and 40 minutes (or up to 60 minutes in a deep, round tin, by which time the cake will be drying out - for round tins, a 4 egg mix is better; 10-12 mins for cupcakes and 15 mins for muffins).

If the cake starts to brown on top but is still very runny underneath, turn the oven down by
As breakfast muffins, wholemeal with honey, lemon & pumpkin seeds
10 degrees C.  The cake will increase in volume and will be thicker in the middle than at the edges, and is done when a toothpick or thin knife comes out clean when poked right through the cake.  If you test your cake and it is not done, never slam the oven door, always close gently.  Slamming makes your cake collapse and undoes all your hard work!


Once cooked, this cake can be enjoyed hot with custard, or cooled, with or without icing.  If kept in a tin, it should stay nice for up to a week.

Enjoy with coffee, tea, hot chocolate - or just in your pyjamas in the dark at 4am with a naughty grin on your face, because frankly who wants to wait till breakfast time.

H xxx

Tuesday, 11 March 2014

Foraging for food....

About a third of this year's crabapples
As a kid, my sister and brothers and I spent countless hours - often with our parents - gathering what people are suddenly, and rather glamourously, terming 'wild food'. When I was a kid, if we called it anything, it was called foraging, or, if we were looking for something specific, would be called after the item in question, with 'ing' on the end.  'Mushrooming', 'blackberrying' and 'bilberrying' loomed large in my childhood as outdoor pursuits - well, this is what my siblings and I used to say, though doubtless my parents would be horrified to see what I am doing to the English language here!  

We would also pick chestnuts in season to roast on our very eco-unfriendly coal fire, and we would look for cob nuts in the woods opposite our house, but the squirrels always seemed to get the lot. I even remember crab fishing off Skarfskerry pier near John o'Groats when we went on holiday, and taking them home in a bucket of seawater for my Nana to cook for lunch the next day.  I think this must have been a rare success, as I also distinctly recall failing to catch anything on a number of occasions!
Homemade jam and jelly

I was never a fan of mushrooms, to the absolute bewilderment of my dad and sister.  Dad was so fascinated by fungi that he would keep an eye out on every country walk, and when something interesting - or edible - was due to sprout, we would all cram into the car to find likely spots.  As I didn't really get much out of eating the spoils, I learned to get the enjoyment in spotting the mushrooms and toadstools themselves.  To this day, I still surprise (or perhaps bore!) walking companions by suddenly saying 'Look at that bracket fungus!' or 'I think this is a ceps!' to which the response is usually 'where?!'  Even now, I can't help but take photos of interesting examples I come 
 across.

This passion for picking wild fruits and nuts is still with me.  Last year, with its late spring and long hot summer, followed by a moderately wet, warm autumn as the fruits were ripening was especially good for crabapples, bilberries, and in the case of varieties that fruited before the rain came in, blackberries.  I even saw wild raspberries this year for the first time - the fruits were tiny and full of seeds, but had a delicious, fragrant and less sweet taste than I am used to.
This batch of crabapple jelly had a gorgeous ruby hue

I was lucky enough to pick several pounds of crabapples - three varieties - from round the rugby field where we like to walk the dogs, although I was glad we are both tall, as someone had the lower ones before I got there! I turned these into three types of jelly; crabapple, crabapple cider and crabapple, red wine and bramble jelly.  I think I got about six or seven pounds of jelly in the end.  If you can blag some jam jars from friends or family, this delicious, slightly sharp jelly is so, so cheap to make - it is simply the cost of the water, the electric or gas to boil out the juice and sterilise the jars, and the sugar (a 5kg bag being about £3.50).  These little apples contain so much pectin that the jelly sets beautifully.  A posh jam making book will tell you to strain the juice through a muslin cloth, but I got fab results with an old cotton teatowel which had washed a bit thin over the years.

Freshly picked sloes - tiny but tasty
I also picked some sloes (a small, bitter relative of the plum which has a spiced flavour, great for making sour jellies to have with cheese) I used them to make sloe gin; even after a just a few months of steeping, this was way better than any commercial variety I have ever had.  This year wasn't ideal for sloes - the cold start to the year seemed to prevent many fruit from setting, so I only got enough for a litre of sloe gin.

I went blackberrying twice last autumn - once near where I live, and once near my parents' place.  Both due to the weather (it rained just as the local ones ripened, so many just mouldered on the vine) and the fact that folks in Bridgend seem to be much savvier blackberry pickers than in Newport, I got a much smaller haul locally.  I also feel a little disloyal saying this, but the blackberries picked in Newport also tasted better.  They are a particularly good variety - large, firm and juicy, with a wonderful flavour for eating fresh or in pies, cakes or jams.  I made most my part of the haul into jam - again, inexpensive as it only cost the price of the sugar and the pectin - around £2-3 for 8 jars of jam.  Friends and colleagues have learned that if they save their jars, they get paid in jam, so I have a massive collection in my understair cupboard!

My favourite forage this year was on a hill my family have been going to for years, overlooking the Bristol channel.  On a clear day, as this was, you can see the whole Severn estuary, with a view of Bristol sprawling into Avonmouth and the two bridges spanning the expanse of water and mudflats between England and Wales.  From a distance, with the sky soaring, these massive man-made structures give a false impression of fragility and seem strangely delicate in the vast space that surrounds them. 
Pounds and pounds of scrumptious berries!

Most of the family went, as well as Millie, and we had the biggest haul any of us could remember. This was mainly due to the conditions being perfect for ripening the berries, but perhaps partly because my brothers and I are now adults, so we pick faster - and, of course, don't eat half as we pick!!

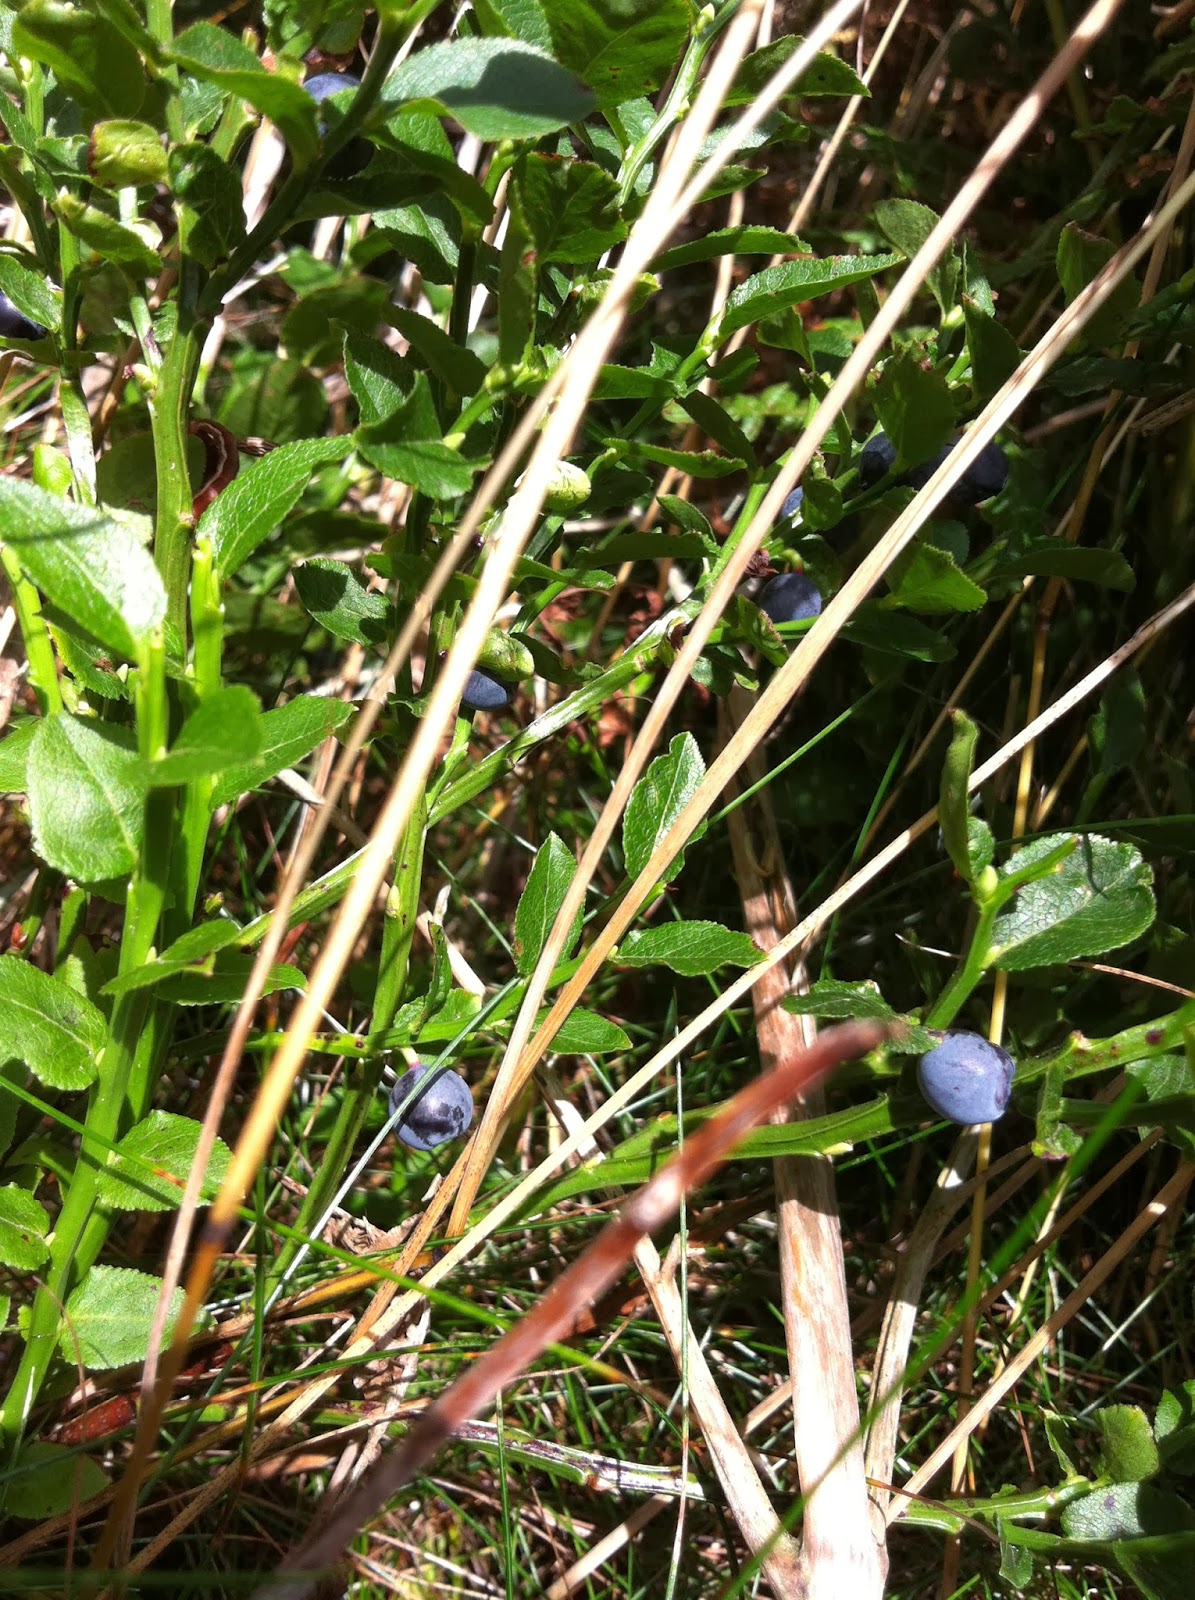
We were picking a kind of wild blueberry which, where my parents and I are originally from, are called bilberries, but in this part of Wales are called wimberries. (They have yet another name in West Wales, I believe!)  This local variation in names is possibly why when we first moved to Wales and excitedly talked about bilberries, everyone looked at us blankly...

Bilberry plants, known as 'wires'
Our bumper haul of bilberries or wimberries was about 3 3/4 pounds - enough for my dad to make bilberry pie AND jam - which he was simply delighted about. I am still saving some of this jam, because it can be years between batches if the weather is not suitable.  

These little berries are so loved in some circles that I am told  greengrocers in Wales used to pay local kids to bring them down from the mountains in punnets during the long summer holidays.  Given how high they need to grow to really thrive, the incentive must have been good! Of course this is no longer a possibility in our world of supermarkets - so if you want them these days, you have to go and get them yourself.

I love finding these various gems in the hedgerows and byways - it makes me feel so much closer to nature and the elements - and to my parents and grandparents and their forebears who have passed on the knowledge of these simple, natural pleasures down through my family to me. 

Wishing you all the wild strawberries, garlic, blueberries, blackberries, sloes, damsons, raspberries, chestnuts, hazelnuts and crabapples you can find this year - and whatever else you like to eat besides!

H
xxx

Monday, 10 March 2014

Lovely baking!

 One of my favourite hobbies is baking!  I especially love baking cakes and pies, and I thought I'd share a few of my most enjoyed moments in the kitchen.


One of my most precious memories is making Christmas cakes with my Nana.  Nana is my mum's mum and is very precious - she is my last living grandparent.  

Although I have many happy memories of baking with her, she is no longer able to stand in the kitchen long enough to make a cake.  She is a feisty lady who isn't shy about giving her opinion.  

Unlike most people I know, she wouldn't hesitate to tell me if she thought the Christmas cake I put in her hamper this year could be improved - so when she said how much she enjoyed it, I was really delighted!  My recipe is based on an old Mrs Beeton one, with a few additions.

Before second coat of jelly
Fully glazed
This is how I decorate my Christmas cakes - it's based on an old Welsh tradition that is believed to be linked to 'smuggler's bounty' - heaping dried and glace fruits on cakes when they were available, and glazing with jam to give a 'jewelled' look. I first tried this because I am not that fond of marzipan and white icing, and I've never looked back!  

Traditionally, the fruit and nuts would be heaped in a pile in the centre of the cake, but I like this slightly more, well, Victorian look!  I spread jam or jelly underneath, add the sliced fruits, nuts and candied ginger in rows from the centre or from the corner, then add another thin layer of jam or jelly on the top. It's best to use a light colour so you can still see the fruit's lovely colours.

This year, I also made mince pies. I made my own mincemeat, using some of the mountain of apples from my mum and dad's allotment, using Delia's recipe: Delia's mincemeat.  I have a bit of a tendency to tweak the ingredients to the ones I have available and adjust the spices to taste, but it's an absolutely great recipe and reliably results in delicious mincemeat.  It's well worth making a little in advance.   

These little fruit pies are so tasty.  This year, I made them with a crumble topping, by keeping back about a third of the breadcrumbs from making the pastry and stirring in a little muscovado sugar, and making a rich buttery pastry with the other 2/3, using egg and a dash of milk and a little icing sugar to sweeten.  The self raising flour means the pastry rises slightly and has a lovely texture.

Another of my favourite bakes is these spiced orange cake squares.  I just added a little allspice, vanilla and natural orange essence to a normal sponge batter. I then did a traybake and cut into squares and popped into individual cases.  To decorate, I just cut a rough star out of a clean plastic cocoa tin lid, rested it on the top of each square, and sprinkled icing sugar, caster sugar and a pinch of allspice mixed together while they were still warm. I thought they looked really cute!

A bake I really enjoyed was the 'Emmatines' I made for Emma's birthday.  I did two types - little squares and cupcakes.  Emma loves teal and showed me the cakes she was dreaming of - and I did my best to recreate them!  I was much happier with the cupcakes than the squares, but as it was my first attempt icing cube shaped cakes I decided not to beat myself up too much.  I must admit despite taking the day off work, I was tearing my hair out a little, because I was also trying to get her quilt finished, but thankfully I did manage it all in time to drive to Manchester for the party!  These were in little gold foil cases - which aren't very eco friendly, but it was a very special occasion...

The last bakes I want to share today are some tear and share breads.  I am sure we cake lovers all have that friend who doesn't share our love of cake and sweet things, and in fact prefers savoury - but nonetheless deserves some love and care on their birthday because they are an all round wonderful person.  So the first of these breads was a personalised bread, made of lots of little stars (because this person is a star) with the birthday girl's initials on. This was made using my parsnip tear and share recipe.


Before rising
Ready for the oven
The finished loaf
The second tear and share I loved making was a cheese and onion bread for the work Christmas party, which i made in the shape of a Christmas wreath. I was worried this wouldn't work - and was so delighted when it did. I've included these before photos so you can see the sort of proportions used to make the loaf so that it kept its shape.

Hope you've enjoyed - and I look forward to hearing about your cooking exploits too!. Happy baking, folks....

H
xxx


Sunday, 9 March 2014

Personalised babygrows

I was sending a parcel to a loved one, who lives abroad, ready for her daughter's birthday.  I had packed up some lovely clothes, but I wanted something a little more personal.  She is always frustrated by the lack of variety in clothes, especially for little girls, and likes her daughters to have brightly coloured garments that reflect their interests, rather than the typical pale pink. I have skyped with them all quite a lot, but have only met the littlest one once.

I bought a pack of 3 babygrows (I looked all over for Fairtrade but couldn't find them - does anyone know where to get plain Fairtrade babygrows?) I washed them and dried them, and then used Giotto fabric pens - by the way, I'm not trying to flog these pens - it's just they are the only decent type available within 20 miles!

They are a brush tip, iron-to-set fabric pen, and they work just like a normal, good quality felt tip marker would, except obviously they stay put when washed.  I found that they lay down quite a bit of ink and blend easily - but I am sure other brands work brilliantly too.  I would stay well away from Dylon pens though.  Their home dyes - especially washing machine ones - have always been fab, but I found their pens were dry and useless, running out very quickly - and they were somewhat pricey as well.

When littlest came to stay with her mummy and older sister, she was already showing a great personality and letting us know her tastes, despite her lack of years! She simply loves fruit - especially strawberries - so I had a clear idea for my first design!

I slid a piece of card inside the babygrow to protect the back from ink transfer, then drew the outlines using the black pen, as well as the writing underneath. I then highlighted the neck and sleeves with complimentary bright colours to make them look a bit more interesting.  I was really pleased with the look when complete.

The next thing she really enjoyed was sitting with her mummy in the garden, watching our chickens scratch and play in their little run.  She sat there for half an hour, giggling and pointing, listening to her mummy talk about the chickens.  She enjoyed looking at all our animals, but was especially fascinated by our hens.  As I am used to drawing animals, I thought this would be a great theme for the second one. Again, I picked out the red colour from the main image to pick out the sleeves and neckline.


Finally, I am afraid I went with family tradition, and opted for a terrible pun.  Littlest really enjoyed fresh fruit and veg while she was staying, and I thought some carrots might be the order of the day - and I thought it might be really cute to create something for the '24 carat baby' she is....

Again, I drew the outlines, let them dry and then filled in the colour. This time, I used orange, yellow and green to complement the design.

I then ironed them all to fix the images, and washed and dried them again, before pressing them ready to send.  These were so quick and easy to make - and don't have to feature picture perfect images.  The brightly coloured inks do seem to be reasonably tolerant to being washed.  

As white babygrows are available reasonably cheaply - way cheaper than those with cute images - and the pens (around £5-£9 a pack depending where you get them) would be enough to decorate a lot of babygrows, this could be a fun way to make something special for a baby, maybe even a project kids could get involved in to welcome a new arrival!

I look forward to reading about more of your projects soon :)

H
xxx


Saturday, 8 March 2014

Pets, beautiful pets.... (photo heavy blog)

Just thought I would take a minute to introduce you to our lovely indoor pets! 

The day we brought her home
My darling cat Pandora was the first of our little zoo.  She's a moggy who we have had from a tiny kitten (we think half Persian but we're not 100% sure).  I fell for a picture of Panny and drove forty miles to collect her immediately.  She was a little ball of fur with big golden green eyes and silken fur and I just fell in love.  My husband is animal obsessed and fell for her like a ton of bricks too.


The experience of buying her was a powerful lesson.  The lady who sold her was insistent that she was quite a chilled out little cat who just wasn't interested in jumping around.  When we said that we had bought her some kitten kibble, she told us not to bother in future as Pandora was 'fine on adult food' - and always tried to eat her mum's kibble out of the bowl.  
Pandora the poser...


When we got out of her darkened living room and had Pan home, we realised that one of the reasons she had no energy was that she was so hungry.  She scoffed the portion of kitten food in record time and immediately perked up. 

The second, equally worrying thing that we noticed when we had her in the light that she was absolutely crawling with fleas.  It was so bad that while my husband rushed to get some flea treatment off Emma, I got her in the bath to
Pandora's box
physically wash the worst of them off her tiny body.  I had never seen so many.  I would never buy an animal this way again; both of us were horrified that anyone who seemed so normal could keep any animal, let alone a kitten, in this condition.


Being dunked in the bath must have been a frightening experience for a tiny little kitten in a new place.  She hated being bathed (as most cats do!) and to this day she has an ongoing war with every hairdryer we bring into the house, but she was so much more comfortable with most of the fleas gone.  Once she had been treated she transformed into a bouncy, playful little kitten - she was so good at hiding, we had to put a bell on her for fear of stepping on her!
Showing off her fluffy tummy


As we've had her, her tail's got bigger and puffier and her fur has got longer and fluffier, as you will see from the photos.  

She is definitely a one and only - we have fostered one cat and adopted another (who sadly died suddenly of a pulmonary embolism just weeks after we had him). She has always been much happier as a single cat, although she gets on fine with our dogs.  One of our favourite sights is our 2 kilo cat chasing our 25 kilo dog round the house in circles.

Millie on her first walk
Our first pooch is Millie, a shar-pei we had from a local rescue kennel called Croft's.  She is chocolate brown and is lazy, loving and has a deep and abiding hatred of baths, just like Pandora...

I originally wanted to get a poodle type - and we went and walked dogs at the pound in order to get used to walking them and the level of fitness we would need, in the hope of eventually finding the right dog for us.  When we first started visiting, we weren't in a position to take home a dog because we were renting, and didn't feel it would be fair to get a dog not knowing whether we would be able to home it reliably in the future.  

Millie settling into her new home
Walking the dogs at the rescue was fun, although it could be sad too.  The first dog we fell for with a thump was called Sindy - a big, gentle silver girl who was a Neapolitan Mastiff cross.  She had to be sent away to a specialist rescue where she could be fostered in a loving home as she was starting to show signs of kennel rage.  Although we were sad to see her go, it was definitely exactly what she needed

The second was an adorable, cheeky Newfoundland girl, Fifi, who broke our hearts, but thankfully for her she found a wonderful home well before we found our little house.  

So when I saw Millie's big brown eyes, I didn't want to fall for her and have to say goodbye again.  The first time we walked her, she was just on the end of the lead the whole time and wouldn't even take a treat.  She was so shy and timid but she blossomed a little more every time we saw her - starting to woof and wag her tail as soon as she saw us walk past her cage.   
Millie sporting her muzzle
Every time we went up to walk her, I knew it would probably be the last one.  I just couldn't believe this sweet pooch would be without a family for long.  But as our house purchase dragged on and on, we still continued to walk her every week.  Finally, our house completed and we were able to visit the rescue centre and amazingly she was still waiting for us!!  

When we first got her home she was totally overwhelmed, having spent months shut in at the rescue centre, and didn't know what to do with new people or places.  She chased Pandora and we had to do weeks and weeks of training to get her to understand that Pandora was boss (now they are good friends and even rub faces when they haven't seen each other all day!)

Millie is the most loving, chilled out dog at home, but not without her problems. She is still afraid of new people, though she doesn't run away any more, and she can be dog aggressive occasionally - especially when she's under the weather.  She has to be walked with a muzzle on at all times, not only because I would not forgive myself if she harmed another dog, but also so she can be safely socialised and with luck, eventually put this behaviour behind her.
Millie with us on our honeymoon

 We've been talking for a while about getting a second dog who can help Millie to learn her manners and to get used to dogs and doggy behaviour so that she doesn't overreact to everything.  We hoped this would improve her confidence and help her to live a happier, more normal doggy life.  Also, as we both work, we wanted her to have company, as she sometimes got stressed about being alone.  But we wanted the right dog - one that is a good fit for our family - friendly, confident, non-shedding (because Millie sheds enough for two!) and able to behave well around cats.

 This is where our darling new pooch comes into the story.  

 
George looking a bit sorry the night he came home

My hubby was looking at the rescue centre's facebook page  about a month ago and noted a video of new dog, 'Sherlock.' He was a pale coloured poodle type dog, dashing about and playing with a squeaky toy.  

He persuaded me that we should go up to Crofts and walk Sherlock - just for the sake of a walk...! I don't know what it was about this video, but I insisted on taking the extra lead, 'just in case'...  After a walk with Millie to check they got on, him demonstrating a fabulous lack of interest in a cat, and then a bit of paperwork, he was ours!

When we got him home, we just weren't sure about his name.  He had been assigned it at the pound, but it didn't seem to fit, and if I am honest I didn't really fancy standing in the park yelling 'SHERLOCK' to call him back!!  So I had a scour through my bookshelf for names and finally settled on George.  He responded to this almost straight away.
George after a clip and a bath


George had been a stray, and though the rescue centre had deflead and wormed him and given him a bath - but he was still straggly, with holes in his coat where he had chewed to scratch the itch, and thick fur between his toes. First thing the day after adopting him, we took him to a brilliant groomer who spent two and a half hours bathing him, clipping his nails, trimming off his tangles, brushing his fur, cleaning his ears - the works!  He looked so much better - but was still a little thin as he wasn't fully recovered.  
George at the park

Now, after a few weeks with us, he is fully settled in.  He has had a few problems with accidents, and at first he was too excited to eat. but he is now getting the hang of living in a home again. 

He has loads of energy, is slowly building up weight, eating properly and bouncing around at the park like a lamb in springtime.  George is a live wire, always bringing his ball for us to throw, bounding around and as delighted as Millie to see us.  His beautiful curly fur is starting to grow back - including the bald patches which are now showing up as light brown spots!

Much to our surprise, Millie was fine with him, without a muzzle, in a matter of days, and after a week we started leaving them alone together, a little at a time.  They now spend their days together and friends have noted that Millie is much more confident and relaxed! 
 
 I hope you've enjoyed being introduced to my little monsters :) 

H
xxx 

Tuesday, 4 March 2014

Thank you - and a bit about my newest idea

I haven't posted for a few days - sorry lovely followers! I've been absolutely chocka - celebrating my hubby's birthday, trying out some new recipes, visiting the Museum of Welsh Life with the lovely Emma, and plotting my next idea out.  And I was overwhelmed by Emma's sweet post yesterday - which just blew me away... I have also appreciated all your kind words and really enjoyed connecting with you!

I have a bit of a habit of starting lots of different projects all at once, so it's sometimes slow progress, but I hope this one won't take too long.  Just a quick word really about this - I am combining my love of music and my love of colour.  

I am in the process of sanding back my beautiful charity shop piano (£100 and sounds wonderfully mellow).  It will need a tune and one of its strings fixed too - I am hoping that this will inspire me to make time for a bit more practice - though to be honest I have so many hobbies I wonder if there will ever be enough time in the day.  I really do miss singing in a choir and can't seem to find a local one to join and would love to get some form of music in my life (though I've always enjoyed music made with other people more than playing or singing on my own).

So here's my old piano, with a few chips and chunks taken out by careless movers, and a dark varnish which makes it look a bit too big for our small house:


Here's my trusty sander - a gift from my wonderful in-laws:


 Here's the colour of the wood underneath that dark varnish: 


As you can see, it's quite golden and quite a rich colour which is really pretty - and though the original plan was just to paint it a lovely country cream, then cover with a couple of coats of varnish for shine, I am starting to love the colour and texture of the wood - and I am quite tempted to just treat it with wax or oil.  The only problem is there are areas of damage - huge chunks missing near the base especially - and I have no idea what wood it is made of.  So I will need to be inventive to keep the wood bare.

And finally - the big reveal, tee hee! 

This is the (satinwood) paint I had mixed to paint the inside of the lid and to pick out some tiny details, like the edge of the top and the stands which hold up the keyboard (as these desperately need replacing and I will not be able to match the wood).  I'd also like to use this to pick out the sides of the keys, as I think that could look really nice.

Here we are: 

I'm really hoping this rich purple will look really good against the natural wood - just enough to pick up the colour without making my piano look like a bag of dairy milk buttons...

So what do you all think?  I'd love to have your comments!

H
xxx

Saturday, 1 March 2014

Drawing and painting

Something I really enjoy is creating little pieces of art for friends and family. I love trying to catch the play of colour and light, and when I paint or draw, I tend to be totally in the moment, losing track of time and frequently ending up covered in ink or paint to boot.  I don't notice when it starts to go dark, or my fingers go numb, or I've missed a meal.  It's the one creative hobby I have which totally engrosses me to the point I can't even manage to converse - not something I normally have a problem with, as any of my friends would tell you!

I've never had much success selling my art, although I have had one small commission (cost plus a notional payment - they used the images and I kept the paintings) from a poultry group we used to attend in Llanfoist (if you live nearby and keep poultry, they are a lovely, welcoming group and I totally recommend popping in!) to create images for notelets - a bit more about that later.  

The great thing about this is, as I have a job, I can just create things that I like, that make me and my friends and family happy, and develop my technique in the direction I want.  And if I am lucky enough to be asked by someone I like to create something special (sometimes at cost, sometimes for gifts) I can take my time over it.  As we don't have a lot of wall space in our little house, the pieces I keep tend to languish in my portfolio - but I enjoy getting them out and looking at them from time to time...

My normal media are pencil, pen or ink and brush on paper, or acrylic on canvas.  I adore (and prefer) the texture, look and feel of oil on canvas - but I just find that by the time the layers have dried I have had to put the painting aside and they never seem to get finished, whereas acrylics suit my reasonably quick way of painting.  You can see one of my acrylic paintings on this post.

 Working in pencil is one of the things I find both easy and difficult.  Graphite is really tactile and flexible as a medium - not to mention familiar, as a pencil was (for me) the first artistic tool I ever held.  Even before I knew I was interested in art or in creating it, I knew how to hold a pencil steady.  I think this is why I find it easiest to get a good finish with a pencil rather than a paintbrush.  

However, the flip side of this is I do tend to go for quite a realistic image when I use pencil which means focussing on detail.  I like to reflect the quality of light and textures - not that I am any expert at this - I still have an awful lot to learn.  One of the things I love about the internet is being able to see the work of people all over the world who are kind enough to share their technique and provide tutorials and information about how they like to work. The above portrait is one of my favourite pencil drawings, which I did about 3 years ago.

The same principle of familiarity applies to working in black pen.  I tend to opt for pen when I want quite a realistic image with lots of detail. I am really comfortable with a pen, having spent most of my school days with one in my hand - and as I doodle constantly I have to keep scrap paper near me at work, to stop me from doodling all over anything important!  When I am thinking, drawing just helps me get my thoughts in order.
. 
I mentioned earlier that I had a request from a poultry group to create images to be used on notelets.  I did four sets of images - and the pen drawings were among my favourites.  Here are two (apologies for the less than ideal photos!)  These were drawn from photos - mainly because it's pretty hard to get birds to sit still to have their portraits drawn.  

The above picture is of a gosling in a teracotta bowl, and the image to the right is of a silver Sebright. I thought the black pen would be ideal for picking out the detail of down on the gosling, and the beautiful laced feathers of the Sebright.  I was really pleased with the results.

The other medium I tend to use is coloured ink, applied with a brush.  I quite often paint with ink, and I love the way the bright, easily blended colours that go down quickly on paper, reminding me of stained glass, and simultaneously of cartoons and comics.  I also enjoy being able to use a slightly more stylistic technique.

This rooster is based on a photo in a poultry magazine.  I know from keeping chooks myself that every bird has its own personality, and I loved that this little guy seemed so sure of himself and stood in such an interesting pose.  

I also thought that the colours of his comb and feathers and the sheen on his wing and tail would really lend themselves to being painted with the bright colours of ink.  

The rooster was one of the early images I did in this style.  It isn't the most perfect image I have ever created, but even now I really enjoy looking at it.

The next ink image for the poultry group was this one of an ex battery hen.  You can see she is a bit bald and only has some feathers left.  This is not un typical for an ex battery bird - I always opted for free range eggs even before I'd ever seen an ex batt.  However, after helping hand out these poor girls to new homes during a day helping out my sisters in law (who volunteer for the fantastic British Hen Welfare Trust) ex batts are close to my heart.

I now try to avoid any product that has non free-range eggs and try never to eat chicken unless I know it's free range.  The group members weren't too keen on this image of a straggly hen for their notelets (!) and voted for other images, but this was based one of the first chooks I ever had, so I love it.  She was called Honey because she was so sweet to us - though she was boss of all the other hens, ruling with an iron beak!  She finally grew her feathers back, and though she never laid had a comfortable 18 months of retirement.

The third is a picture of a turkey which I photographed on a day out with friends. The sheen on his feathers seemed to shimmer a different colour with every movement, and I also liked his solemn, sad looking face and the shy way he would look at me when I tried to take his picture, but at the same time standing between me and his hen to protect her.


The final image I created for the group was of a white runner drake. They have such interesting lines and angular bodies.  This one was a real joy to paint and turned out almost exactly how I imagined it would. I tried to keep it really simple, using just black, blue and orange to give the impression of light, and hint at his downy feathers.My sister fell in love with this image - so I popped it in the post to her at Christmas time as a nice surprise.

 
I also paint pictures of food and a few other things in this way, but I really enjoy painting birds and animals, so the last of the ink images I want to share (just because I like them) are of Canadian wildlife. 

I painted these for friends in Canada who are really outdoorsy and have two little girls.  The Canada goose and a young Arctic hare are in slightly more muted tones than the images above and have a slightly more natural look, though they are quite stylised. 


Well, at the end of this very long post, I'd like to thank you for reading to the end! 

I really hope you have enjoyed the images I have shared - and if you'd like to post up links to any art you may have created, including photos, I would love to have a look, so please do share.  I love looking at the way other people see colour and light.  

Night, lovely followers!  

H
xxx